Wednesday, February 4, 2015
Android beginner tutorial Part 43 AlertDialog custom layout
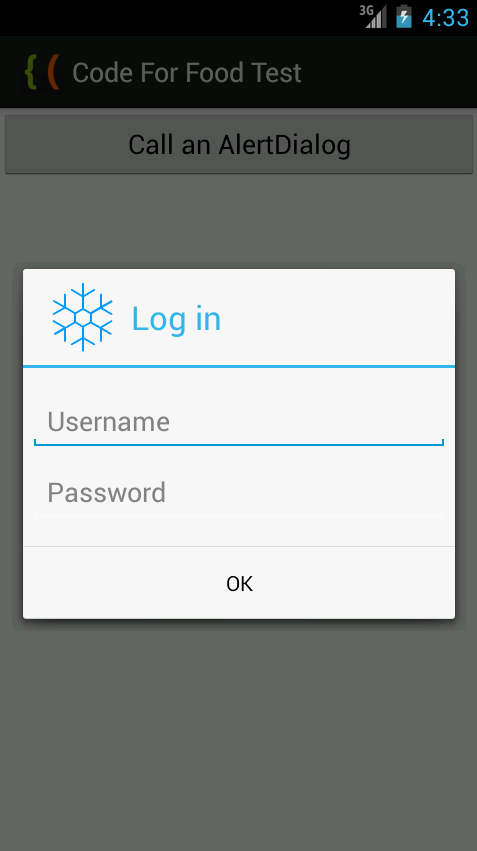
Firstly, create the layout xml. I called mine custom_alert_layout.xml. It is a simple LinearLayout container with 2 EditTexts in it - with ids username and password. They are also stylized to look and behave like username and password fields in a log in window.
<?xml version="1.0" encoding="utf-8"?>
<LinearLayout xmlns:android="http://schemas.android.com/apk/res/android"
    android:orientation="vertical"
    android:layout_width="wrap_content"
    android:layout_height="wrap_content">
    <EditText
        android:id="@+id/username"
        android:inputType="textEmailAddress"
        android:layout_width="match_parent"
        android:layout_height="wrap_content"
        android:layout_marginTop="16dp"
        android:layout_marginLeft="4dp"
        android:layout_marginRight="4dp"
        android:layout_marginBottom="4dp"
        android:hint="Username" />
    <EditText
        android:id="@+id/password"
        android:inputType="textPassword"
        android:layout_width="match_parent"
        android:layout_height="wrap_content"
        android:layout_marginTop="4dp"
        android:layout_marginLeft="4dp"
        android:layout_marginRight="4dp"
        android:layout_marginBottom="16dp"
        android:fontFamily="sans-serif"
        android:hint="Password"/>
</LinearLayout>
Now go to MainActivity.java class. First we declare a View:
private View alertView;
Then in onCreate() function we can use a LayoutInflater to get a View out of the xml layout. Apply this View value to alertView:
LayoutInflater inflater = LayoutInflater.from(getApplicationContext());
alertView = inflater.inflate(R.layout.custom_alert_layout, null);
You can apply this view to the AlertDialog using the builders setView() method:
builder.setView(alertView);
You can still use AlertDialogs elements made with the builder though! Ill add a title, an icon and a button to this layout using the builder.
In the onClick() event handler function of the button, I extract the text values of the two EditText objects and display them in a Toast:
@Override
public void onClick(DialogInterface dialog, int which) {
EditText t_user = (EditText)alertView.findViewById(R.id.username);
EditText t_pass = (EditText)alertView.findViewById(R.id.password);
String username = t_user.getText().toString();
String password = t_pass.getText().toString();
Toast toast = Toast.makeText(getApplicationContext(), "User: " + username + ", Pass: " + password, Toast.LENGTH_SHORT);
toast.show();
}
Full code:
package com.kircode.codeforfood_test;

import android.app.Activity;
import android.app.AlertDialog;
import android.content.DialogInterface;
import android.os.Bundle;
import android.view.LayoutInflater;
import android.view.Menu;
import android.view.View;
import android.widget.Button;
import android.widget.EditText;
import android.widget.Toast;

public class MainActivity extends Activity{

private AlertDialog myDialog;
private View alertView;

@Override
protected void onCreate(Bundle savedInstanceState) {
super.onCreate(savedInstanceState);
setContentView(R.layout.activity_main);

Button button = (Button)findViewById(R.id.testButton);

AlertDialog.Builder builder = new AlertDialog.Builder(MainActivity.this);

LayoutInflater inflater = LayoutInflater.from(getApplicationContext());
alertView = inflater.inflate(R.layout.custom_alert_layout, null);
builder.setView(alertView);

builder.setTitle("Log in");
builder.setIcon(R.drawable.snowflake);

builder.setPositiveButton("OK", new DialogInterface.OnClickListener() {

@Override
public void onClick(DialogInterface dialog, int which) {
EditText t_user = (EditText)alertView.findViewById(R.id.username);
EditText t_pass = (EditText)alertView.findViewById(R.id.password);
String username = t_user.getText().toString();
String password = t_pass.getText().toString();
Toast toast = Toast.makeText(getApplicationContext(), "User: " + username + ", Pass: " + password, Toast.LENGTH_SHORT);
toast.show();
}
});

builder.setCancelable(false);
myDialog = builder.create();

button.setOnClickListener(new View.OnClickListener() {

@Override
public void onClick(View v) {
myDialog.show();
}
});
}

@Override
public boolean onCreateOptionsMenu(Menu menu) {
// Inflate the menu; this adds items to the action bar if it is present.
getMenuInflater().inflate(R.menu.activity_main, menu);
return true;
}

}
The resulting application looks something like this:

Thanks for reading!
Subscribe to:
Post Comments (Atom)
No comments:
Post a Comment
Note: Only a member of this blog may post a comment.