Showing posts with label beginner. Show all posts
Showing posts with label beginner. Show all posts
Wednesday, February 4, 2015
Android beginner tutorial Part 43 AlertDialog custom layout
In this tutorial we will learn how to create a custom layout for an AlertDialog.
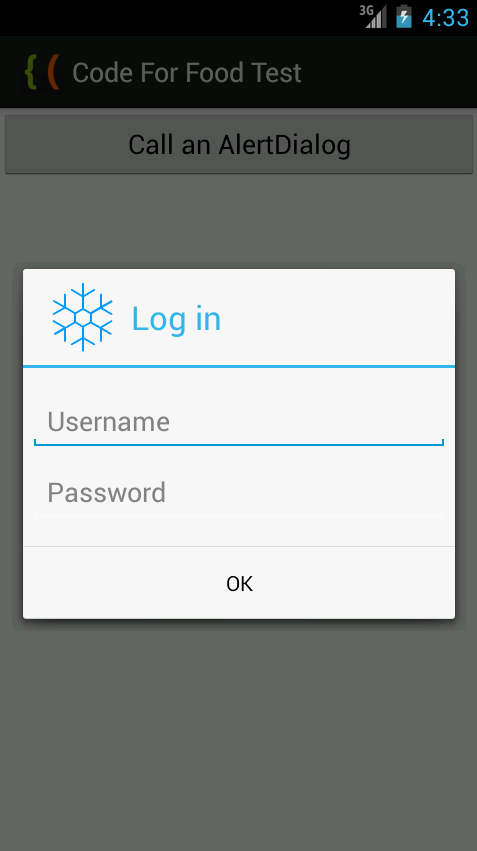
Firstly, create the layout xml. I called mine custom_alert_layout.xml. It is a simple LinearLayout container with 2 EditTexts in it - with ids username and password. They are also stylized to look and behave like username and password fields in a log in window.
Now go to MainActivity.java class. First we declare a View:
Then in onCreate() function we can use a LayoutInflater to get a View out of the xml layout. Apply this View value to alertView:
You can apply this view to the AlertDialog using the builders setView() method:
You can still use AlertDialogs elements made with the builder though! Ill add a title, an icon and a button to this layout using the builder.
In the onClick() event handler function of the button, I extract the text values of the two EditText objects and display them in a Toast:
Full code:
The resulting application looks something like this:
Thanks for reading!
Read more »
Firstly, create the layout xml. I called mine custom_alert_layout.xml. It is a simple LinearLayout container with 2 EditTexts in it - with ids username and password. They are also stylized to look and behave like username and password fields in a log in window.
<?xml version="1.0" encoding="utf-8"?>
<LinearLayout xmlns:android="http://schemas.android.com/apk/res/android"
    android:orientation="vertical"
    android:layout_width="wrap_content"
    android:layout_height="wrap_content">
    <EditText
        android:id="@+id/username"
        android:inputType="textEmailAddress"
        android:layout_width="match_parent"
        android:layout_height="wrap_content"
        android:layout_marginTop="16dp"
        android:layout_marginLeft="4dp"
        android:layout_marginRight="4dp"
        android:layout_marginBottom="4dp"
        android:hint="Username" />
    <EditText
        android:id="@+id/password"
        android:inputType="textPassword"
        android:layout_width="match_parent"
        android:layout_height="wrap_content"
        android:layout_marginTop="4dp"
        android:layout_marginLeft="4dp"
        android:layout_marginRight="4dp"
        android:layout_marginBottom="16dp"
        android:fontFamily="sans-serif"
        android:hint="Password"/>
</LinearLayout>
Now go to MainActivity.java class. First we declare a View:
private View alertView;
Then in onCreate() function we can use a LayoutInflater to get a View out of the xml layout. Apply this View value to alertView:
LayoutInflater inflater = LayoutInflater.from(getApplicationContext());
alertView = inflater.inflate(R.layout.custom_alert_layout, null);
You can apply this view to the AlertDialog using the builders setView() method:
builder.setView(alertView);
You can still use AlertDialogs elements made with the builder though! Ill add a title, an icon and a button to this layout using the builder.
In the onClick() event handler function of the button, I extract the text values of the two EditText objects and display them in a Toast:
@Override
public void onClick(DialogInterface dialog, int which) {
EditText t_user = (EditText)alertView.findViewById(R.id.username);
EditText t_pass = (EditText)alertView.findViewById(R.id.password);
String username = t_user.getText().toString();
String password = t_pass.getText().toString();
Toast toast = Toast.makeText(getApplicationContext(), "User: " + username + ", Pass: " + password, Toast.LENGTH_SHORT);
toast.show();
}
Full code:
package com.kircode.codeforfood_test;

import android.app.Activity;
import android.app.AlertDialog;
import android.content.DialogInterface;
import android.os.Bundle;
import android.view.LayoutInflater;
import android.view.Menu;
import android.view.View;
import android.widget.Button;
import android.widget.EditText;
import android.widget.Toast;

public class MainActivity extends Activity{

private AlertDialog myDialog;
private View alertView;

@Override
protected void onCreate(Bundle savedInstanceState) {
super.onCreate(savedInstanceState);
setContentView(R.layout.activity_main);

Button button = (Button)findViewById(R.id.testButton);

AlertDialog.Builder builder = new AlertDialog.Builder(MainActivity.this);

LayoutInflater inflater = LayoutInflater.from(getApplicationContext());
alertView = inflater.inflate(R.layout.custom_alert_layout, null);
builder.setView(alertView);

builder.setTitle("Log in");
builder.setIcon(R.drawable.snowflake);

builder.setPositiveButton("OK", new DialogInterface.OnClickListener() {

@Override
public void onClick(DialogInterface dialog, int which) {
EditText t_user = (EditText)alertView.findViewById(R.id.username);
EditText t_pass = (EditText)alertView.findViewById(R.id.password);
String username = t_user.getText().toString();
String password = t_pass.getText().toString();
Toast toast = Toast.makeText(getApplicationContext(), "User: " + username + ", Pass: " + password, Toast.LENGTH_SHORT);
toast.show();
}
});

builder.setCancelable(false);
myDialog = builder.create();

button.setOnClickListener(new View.OnClickListener() {

@Override
public void onClick(View v) {
myDialog.show();
}
});
}

@Override
public boolean onCreateOptionsMenu(Menu menu) {
// Inflate the menu; this adds items to the action bar if it is present.
getMenuInflater().inflate(R.menu.activity_main, menu);
return true;
}

}
The resulting application looks something like this:
Thanks for reading!

Android beginner tutorial Part 12 EditText component
Today well learn about the EditText widget.
The EditText component is used to allow the user enter text. EditText is a class that extends TextView, but instead of just displaying the text, it displays it in a text field with a slight border and lets the user edit the text by tapping on the field.
The main class of the EditText class is getText(). It returns the text that is currently the value of this text field, but the type of the returned value is Editable, not String. The difference is that the Editable type is a text interface, which has variable text (based on the changes in the text field), as opposed to String, which is just a piece of text that doesnt change.
Theres also a method called setHint(), which displays a tip that is supposed to give the user an idea of what the text fields purpose is. Its value can be set to, for example, "Enter text here..." or "Your message..." The user sees it as the value of the textfield before he taps on it. Then it gets changed to whatever text he enters.
There are also a few methods in the class for managing text selection, such as selectAll(), setSelection(int start, int stop), setSelection(int index). The difference between the two setSelection() methods is that the first way to use it is to specify the beginning and ending indices of the selection, while the other way to use it is to just provide 1 value which sets the cursor to a specific index position.
Lets create a simple example in our activity_main.xml layout in our Android project.
Heres the code:
The strings.xml code:
The results:
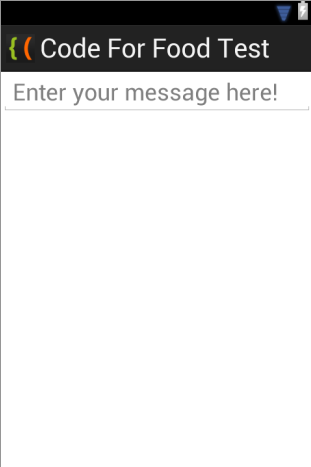
If you test your application now, youll see that after tapping on the text field, a keyboard UI pops up just like it usually does when entering text using the device.
Thats all for today.
Thanks for reading!
Read more »
The EditText component is used to allow the user enter text. EditText is a class that extends TextView, but instead of just displaying the text, it displays it in a text field with a slight border and lets the user edit the text by tapping on the field.
The main class of the EditText class is getText(). It returns the text that is currently the value of this text field, but the type of the returned value is Editable, not String. The difference is that the Editable type is a text interface, which has variable text (based on the changes in the text field), as opposed to String, which is just a piece of text that doesnt change.
Theres also a method called setHint(), which displays a tip that is supposed to give the user an idea of what the text fields purpose is. Its value can be set to, for example, "Enter text here..." or "Your message..." The user sees it as the value of the textfield before he taps on it. Then it gets changed to whatever text he enters.
There are also a few methods in the class for managing text selection, such as selectAll(), setSelection(int start, int stop), setSelection(int index). The difference between the two setSelection() methods is that the first way to use it is to specify the beginning and ending indices of the selection, while the other way to use it is to just provide 1 value which sets the cursor to a specific index position.
Lets create a simple example in our activity_main.xml layout in our Android project.
Heres the code:
<LinearLayout xmlns:android="http://schemas.android.com/apk/res/android"
    xmlns:tools="http://schemas.android.com/tools"
    android:layout_width="match_parent"
    android:layout_height="match_parent"
    android:orientation="vertical"
    tools:context=".MainActivity" >

    <EditText
        android:layout_width="match_parent"
        android:layout_height="wrap_content"
        android:hint="@string/textHint"
        android:textSize="24sp"/>

</LinearLayout>
The strings.xml code:
<?xml version="1.0" encoding="utf-8"?>
<resources>

    <string name="app_name">Code For Food Test</string>
    <string name="textHint">Enter your message here!</string>
    <string name="menu_settings">Settings</string>

</resources>
The results:
If you test your application now, youll see that after tapping on the text field, a keyboard UI pops up just like it usually does when entering text using the device.
Thats all for today.
Thanks for reading!
Saturday, January 31, 2015
Android beginner tutorial Part 74 Calling contacts confirming deletion
In this tutorial well add the ability to call contacts by clicking their name, as well as add a confirmation window when deleting contacts.
Go to onCreate() function and add an item click listener for the list. In the handler, retreive the phone number value using the cursor and then use a function call() with the number as the parameter:
Full onCreate() function:
The call() method receives the phone number and calls it using an intent.
Make sure that phone calling is permitted in AndroidManifest.xml:
Now declare a new variable, deleteDialog:
In the dialogEdit() function, find the part where the Negative button is set. In the click handler, call a function called deleteConfirm() and pass the id as an integer as the parameter:
Full dialogEdit() function:
Create the deleteConfirm() function. Inside of it, build a new Dialog with two buttons - a positive "Delete" and negative "Cancel".
Delete the contact from the database when "Delete" is pressed, and do nothing when "Cancel" is pressed:
Thats all! Here is the full code:
We now have a simple application that lets us create a simple editable contact list, which we can use to call people.
Thanks for reading!
Read more »
Go to onCreate() function and add an item click listener for the list. In the handler, retreive the phone number value using the cursor and then use a function call() with the number as the parameter:
list.setOnItemClickListener(new OnItemClickListener() {
public void onItemClick(AdapterView<?> parent, View view, int position, long id) {
cursor.moveToPosition(position);
call(cursor.getString(2));
}
});
Full onCreate() function:
@Override
protected void onCreate(Bundle savedInstanceState) {
super.onCreate(savedInstanceState);
setContentView(R.layout.activity_main);

ListView list = (ListView)findViewById(R.id.contactList);
list.setOnItemLongClickListener(new OnItemLongClickListener() {
public boolean onItemLongClick(AdapterView<?> parent, View view, int position, long id) {
dialogEdit(position, id);
return true;
}
});

list.setOnItemClickListener(new OnItemClickListener() {
public void onItemClick(AdapterView<?> parent, View view, int position, long id) {
cursor.moveToPosition(position);
call(cursor.getString(2));
}
});

updateList();
}
The call() method receives the phone number and calls it using an intent.
public void call(String phone){
        Intent callIntent = new Intent(Intent.ACTION_CALL);
        callIntent.setData(Uri.parse("tel:"+phone));
        startActivity(callIntent);
}
Make sure that phone calling is permitted in AndroidManifest.xml:
<uses-permission android:name="android.permission.CALL_PHONE"/>
Now declare a new variable, deleteDialog:
private AlertDialog deleteDialog;
In the dialogEdit() function, find the part where the Negative button is set. In the click handler, call a function called deleteConfirm() and pass the id as an integer as the parameter:
builder.setNegativeButton("Delete", new DialogInterface.OnClickListener() {

@Override
public void onClick(DialogInterface dialog, int which) {
deleteConfirm((int)id);
}
});
Full dialogEdit() function:
public void dialogEdit(final int position, final long id){
AlertDialog.Builder builder = new AlertDialog.Builder(MainActivity.this);

LayoutInflater inflater = LayoutInflater.from(getApplicationContext());
alertView = inflater.inflate(R.layout.add_window, null);
builder.setView(alertView);

builder.setTitle("Edit contact");

builder.setPositiveButton("Save", new DialogInterface.OnClickListener() {

@Override
public void onClick(DialogInterface dialog, int which) {
EditText t_name = (EditText)alertView.findViewById(R.id.inp_name);
EditText t_phone = (EditText)alertView.findViewById(R.id.inp_phone);
String new_name = t_name.getText().toString();
String new_phone = t_phone.getText().toString();
ContentValues values = new ContentValues();
values.put(myDbHelper.NAME, new_name);
values.put(myDbHelper.PHONE, new_phone);
getContentResolver().update(CONTENT_URI, values, myDbHelper._ID+"="+id, null);
updateList();
}
});

builder.setNegativeButton("Delete", new DialogInterface.OnClickListener() {

@Override
public void onClick(DialogInterface dialog, int which) {
deleteConfirm((int)id);
}
});

builder.setCancelable(true);

EditText t_name = (EditText)alertView.findViewById(R.id.inp_name);
EditText t_phone = (EditText)alertView.findViewById(R.id.inp_phone);
cursor.moveToPosition(position);
t_name.setText(cursor.getString(1));
t_phone.setText(cursor.getString(2));

editDialog = builder.create();
editDialog.show();
}
Create the deleteConfirm() function. Inside of it, build a new Dialog with two buttons - a positive "Delete" and negative "Cancel".
Delete the contact from the database when "Delete" is pressed, and do nothing when "Cancel" is pressed:
public void deleteConfirm(final int id){
AlertDialog.Builder builder = new AlertDialog.Builder(MainActivity.this);

builder.setTitle("Delete contact?");
builder.setMessage("Are you sure you want to delete this contact?");

builder.setPositiveButton("Delete", new DialogInterface.OnClickListener() {

@Override
public void onClick(DialogInterface dialog, int which) {
getContentResolver().delete(CONTENT_URI, myDbHelper._ID+"="+id, null);
updateList();
}
});

builder.setNegativeButton("Cancel", new DialogInterface.OnClickListener() {

@Override
public void onClick(DialogInterface dialog, int which) {
}
});

builder.setCancelable(true);

deleteDialog = builder.create();
deleteDialog.show();
}
Thats all! Here is the full code:
package com.kircode.codeforfood_test;

import android.app.Activity;
import android.app.AlertDialog;
import android.content.ContentResolver;
import android.content.ContentValues;
import android.content.DialogInterface;
import android.content.Intent;
import android.database.Cursor;
import android.net.Uri;
import android.os.Bundle;
import android.support.v4.widget.SimpleCursorAdapter;
import android.view.LayoutInflater;
import android.view.Menu;
import android.view.MenuItem;
import android.view.View;
import android.widget.AdapterView;
import android.widget.AdapterView.OnItemClickListener;
import android.widget.AdapterView.OnItemLongClickListener;
import android.widget.EditText;
import android.widget.ListAdapter;
import android.widget.ListView;

public class MainActivity extends Activity{

private static final Uri CONTENT_URI = Uri.parse("content://com.kircode.codeforfood_test.mycontentprovider/contacts");
private static final int IDM_ADD = 101;

private AlertDialog addDialog;
private AlertDialog deleteDialog;
private AlertDialog editDialog;
private View alertView;
private Cursor cursor;

@Override
protected void onCreate(Bundle savedInstanceState) {
super.onCreate(savedInstanceState);
setContentView(R.layout.activity_main);

ListView list = (ListView)findViewById(R.id.contactList);
list.setOnItemLongClickListener(new OnItemLongClickListener() {
public boolean onItemLongClick(AdapterView<?> parent, View view, int position, long id) {
dialogEdit(position, id);
return true;
}
});

list.setOnItemClickListener(new OnItemClickListener() {
public void onItemClick(AdapterView<?> parent, View view, int position, long id) {
cursor.moveToPosition(position);
call(cursor.getString(2));
}
});

updateList();
}

@Override
public boolean onCreateOptionsMenu(Menu menu){
menu.add(Menu.NONE, IDM_ADD, Menu.NONE, "Add");
return(super.onCreateOptionsMenu(menu));
}

@Override
public boolean onOptionsItemSelected(MenuItem item){
switch(item.getItemId()){
case IDM_ADD:
dialogAdd();
break;
}
return(super.onOptionsItemSelected(item));
}

public void call(String phone){
        Intent callIntent = new Intent(Intent.ACTION_CALL);
        callIntent.setData(Uri.parse("tel:"+phone));
        startActivity(callIntent);
}

public void dialogAdd(){
AlertDialog.Builder builder = new AlertDialog.Builder(MainActivity.this);

LayoutInflater inflater = LayoutInflater.from(getApplicationContext());
alertView = inflater.inflate(R.layout.add_window, null);
builder.setView(alertView);

builder.setTitle("Add contact");

builder.setPositiveButton("OK", new DialogInterface.OnClickListener() {

@Override
public void onClick(DialogInterface dialog, int which) {
EditText t_name = (EditText)alertView.findViewById(R.id.inp_name);
EditText t_phone = (EditText)alertView.findViewById(R.id.inp_phone);
String new_name = t_name.getText().toString();
String new_phone = t_phone.getText().toString();
ContentValues values = new ContentValues();
values.put(myDbHelper.NAME, new_name);
values.put(myDbHelper.PHONE, new_phone);
getContentResolver().insert(CONTENT_URI, values);
updateList();
}
});

builder.setCancelable(true);
addDialog = builder.create();

addDialog.show();
}

public void dialogEdit(final int position, final long id){
AlertDialog.Builder builder = new AlertDialog.Builder(MainActivity.this);

LayoutInflater inflater = LayoutInflater.from(getApplicationContext());
alertView = inflater.inflate(R.layout.add_window, null);
builder.setView(alertView);

builder.setTitle("Edit contact");

builder.setPositiveButton("Save", new DialogInterface.OnClickListener() {

@Override
public void onClick(DialogInterface dialog, int which) {
EditText t_name = (EditText)alertView.findViewById(R.id.inp_name);
EditText t_phone = (EditText)alertView.findViewById(R.id.inp_phone);
String new_name = t_name.getText().toString();
String new_phone = t_phone.getText().toString();
ContentValues values = new ContentValues();
values.put(myDbHelper.NAME, new_name);
values.put(myDbHelper.PHONE, new_phone);
getContentResolver().update(CONTENT_URI, values, myDbHelper._ID+"="+id, null);
updateList();
}
});

builder.setNegativeButton("Delete", new DialogInterface.OnClickListener() {

@Override
public void onClick(DialogInterface dialog, int which) {
deleteConfirm((int)id);
}
});

builder.setCancelable(true);

EditText t_name = (EditText)alertView.findViewById(R.id.inp_name);
EditText t_phone = (EditText)alertView.findViewById(R.id.inp_phone);
cursor.moveToPosition(position);
t_name.setText(cursor.getString(1));
t_phone.setText(cursor.getString(2));

editDialog = builder.create();
editDialog.show();
}

public void deleteConfirm(final int id){
AlertDialog.Builder builder = new AlertDialog.Builder(MainActivity.this);

builder.setTitle("Delete contact?");
builder.setMessage("Are you sure you want to delete this contact?");

builder.setPositiveButton("Delete", new DialogInterface.OnClickListener() {

@Override
public void onClick(DialogInterface dialog, int which) {
getContentResolver().delete(CONTENT_URI, myDbHelper._ID+"="+id, null);
updateList();
}
});

builder.setNegativeButton("Cancel", new DialogInterface.OnClickListener() {

@Override
public void onClick(DialogInterface dialog, int which) {
}
});

builder.setCancelable(true);

deleteDialog = builder.create();
deleteDialog.show();
}

public void updateList(){
String[] columns = new String[] {myDbHelper._ID, myDbHelper.NAME, myDbHelper.PHONE};
ContentResolver resolver = getContentResolver();
cursor = resolver.query(CONTENT_URI, columns, null, null, null);

final ListAdapter adapter = new SimpleCursorAdapter(this, R.layout.customrow, cursor, new String[] {myDbHelper.NAME, myDbHelper.PHONE}, new int[] {R.id.t_name, R.id.t_phone}, 0);
ListView list = (ListView)findViewById(R.id.contactList);
list.setAdapter(adapter);
}

}
We now have a simple application that lets us create a simple editable contact list, which we can use to call people.
Thanks for reading!
Subscribe to:
Posts (Atom)