Showing posts with label how. Show all posts
Showing posts with label how. Show all posts
Monday, March 2, 2015
How to Make Easy Page Borders in Microsoft Word!
This weeks technology tutorial is something that is easy but SO awesome! I have to give a big shout out to my friend Katie for showing my this one! Shes one of my lovely co-workers and has the most amazing ideas! And she absolutely needs to start a blog! (Hint, hint!!!) :)


For next weeks poll, Im going to add how to use both portrait and landscape lines in PowerPoint. Be sure to vote!
Read more »
This tutorial was by far the most popular on the poll this week!
Before I start the tutorial, I just want to take a quick moment to think about all the lives that were lost eleven years ago today. Being from NY (north of the city), the attack really hit close to home. Two weekends ago I went down to the city and saw some of the new towers that theyre building. Theyre absolutely amazing, but its unfortunate to think of the events that led us to the new construction.
Im sure you already have already, but just take a moment to think about the lives that were lost.
Now, heres the tutorial for the week...
Im sure you already have already, but just take a moment to think about the lives that were lost.
Now, heres the tutorial for the week...
You can download this tutorial as a PDF by clicking this picture!
Note: This tutorial is hosted on Google Docs. To save it from there, just open the file and click File > Download to save onto your computer!
For next weeks poll, Im going to add how to use both portrait and landscape lines in PowerPoint. Be sure to vote!

Saturday, February 28, 2015
How to Make Any Picture a Coloring Page!
Its time for another technology tutorial... and this one is super fun (and could make a great gift for the holidays! This week well learn how to make any picture into a coloring page!


The picture that I used for this tutorial is one of my husband when he was 3. How cute is he!?
This tutorial definitely works best with a picture that has good lighting. I tried it with another picture that had a dark background and it didnt look as nice... so try it with lots of different pictures!


The next poll will be up for two weeks... since next Tuesday is Christmas Day, I wont be posting a new tutorial, but you can definitely expect one the following Tuesday (even though its New Years Day!)
Next week, Ill add how to make a text box transparent or semi-transparent (in Word or PowerPoint).
Read more »
Heres the poll for this week... this one won by a landslide!
The picture that I used for this tutorial is one of my husband when he was 3. How cute is he!?
This tutorial definitely works best with a picture that has good lighting. I tried it with another picture that had a dark background and it didnt look as nice... so try it with lots of different pictures!
You can download this tutorial as a PDF by clicking this picture!
Note: This tutorial is hosted on Google Docs. To save it from there, just open the file and click File > Download to save onto your computer!
The next poll will be up for two weeks... since next Tuesday is Christmas Day, I wont be posting a new tutorial, but you can definitely expect one the following Tuesday (even though its New Years Day!)
Next week, Ill add how to make a text box transparent or semi-transparent (in Word or PowerPoint).
How to Organize Your Classroom Library Complete Library Organization Kit!
If youre in the mood to do some spring cleaning, why not clean up your library by reorganizing it? I absolutely love the way I organize my classroom books! Like most teachers, I use labels on my book bins that have pictures, but, I went even further than that! I put matching labels on each book so that the children put them back in the right bin! The system is so simple, that even a preschooler can use it!
 The labels for the bins are 5" x 3.75," which is the perfect size for many book bins, including Lakeshore bins (LC91 & YB10).
The labels for the books are easy to print... they line up perfectly on Avery 5160 labels, so all you have to do is peel and stick! I put the labels on the back cover of my books for two reasons:
1. Its not covering any of the front cover!
2. Its the perfect way to introduce the vocabulary "back of the book," which is on many Kindergarten reading assessments!
I am selling this complete library organization system for your classroom for only $8. And I havent even told you the best part! If you want me to add any labels, Ill make them asap and revise the file on TPT. This is all youll ever need to organize your books forever!
At the moment, the labels that are included are:
Authors and Series:
ELA Topics:
General Topics:
Holidays and Celebrations:
Math:
Science:
Social Studies:
Misc.
That means you get labels for 82 different categories... for only $8! And again, the best part is that if you want me to add any additional labels, all you have to do is ask! Ill make them asap and revise the file on TPT. This means that $8 is all youll ever need to spend to organize your books forever!
Click any of the pictures below to head on over to TPT to download the free preview and check it out for yourself. (Note: The free preview is a PDF, but the actual download is a ZIP with DOC and PDF files.)


Read more »
The labels for the books are easy to print... they line up perfectly on Avery 5160 labels, so all you have to do is peel and stick! I put the labels on the back cover of my books for two reasons:
1. Its not covering any of the front cover!
2. Its the perfect way to introduce the vocabulary "back of the book," which is on many Kindergarten reading assessments!
I am selling this complete library organization system for your classroom for only $8. And I havent even told you the best part! If you want me to add any labels, Ill make them asap and revise the file on TPT. This is all youll ever need to organize your books forever!
At the moment, the labels that are included are:
Authors and Series:
- Amelia Bedelia
- Arthur
- Berenstain Bears
- Cam Jansen
- Clifford
- Dr. Seuss
- Eric Carle
- Ezra Jack Keats
- I Spy
- Junie B. Jones
- Little Critters
- Lois Ehlert
- Magic School Bus
- Richard Scarry
- Wheres Waldo
- Winnie the Pooh
ELA Topics:
- Alphabet
- Fairy Tales
- Nursery Rhymes
- Poetry
General Topics:
- Art
- Language Arts
- Music
- Social Studies
Holidays and Celebrations:
- 100th Day
- Birthday
- Christmas
- Easter
- Fathers Day
- Graduation
- Halloween
- Hanukkah
- Kwanza
- Martin Luther King Jr.
- Mothers Day
- New Years Day
- Passover
- St. Patricks Day
- Thanksgiving
- Valentines Day
Math:
- Addition and Subtraction
- Counting Backwards
- Counting
- Graphs
- Math
- Measurement
- Money
- Multiplication and Division
- Patterns
- Shapes
- Sorting
- Time
Science:
- Animals (Fiction)
- Animals (Non-Fiction)
- Animals in Winder
- Apples and Pumpkins
- Dinosaurs
- Environment
- Five Senses
- Human Body
- Insects
- Keeping Healthy
- Magnets
- Ocean
- Outer Space
- Plants
- Season - Autumn
- Season - Spring
- Season - Summer
- Season - Winter
- Seasons
- Weather
Social Studies:
- Community Helpers
- Family
- Friends
- I Am Special
- Manners
- Neighborhood
Misc.
- Favorite Stories (For those classic stories like The Velveteen Rabbit or Corduroy!)
- Our Books (For student authors!)
- Starting School
- Transportation
That means you get labels for 82 different categories... for only $8! And again, the best part is that if you want me to add any additional labels, all you have to do is ask! Ill make them asap and revise the file on TPT. This means that $8 is all youll ever need to spend to organize your books forever!
Click any of the pictures below to head on over to TPT to download the free preview and check it out for yourself. (Note: The free preview is a PDF, but the actual download is a ZIP with DOC and PDF files.)
Thursday, February 26, 2015
How to Make Items That are Easy to Cut!
Cutting out lamination can be such a pain... but if you make your classroom games/signs yourself, you can actually make them incredibly easy to cut! the cards that I have in the preview only took me three slices to cut out!

Here are the poll results!

Now onto the tutorial!


As far as cutting the lamination, I also recommend getting a nice paper cutter. I have one like the one below, which seems to cut nicely through cardstock/lamination.

As for next weeks tutorial, Im going to add something a bit more specific... how to make your own cut/paste items in powerpoint!
Read more »
Here are the poll results!
Now onto the tutorial!
You can download this tutorial as a PDF by clicking this picture!
Note: This tutorial is hosted on Google Docs. To save it from there, just open the file and click File > Download to save onto your computer!
As far as cutting the lamination, I also recommend getting a nice paper cutter. I have one like the one below, which seems to cut nicely through cardstock/lamination.
As for next weeks tutorial, Im going to add something a bit more specific... how to make your own cut/paste items in powerpoint!
Wednesday, February 18, 2015
My Mouse is not Working How to Use Mouse With the Help of Keyboard

Hi friends, after a long time I am back again to share some tips and tricks with you. Many times it occurs that your mouse stop working due to some reasons, in that case you are unable to use the mouse pointer. You may face so many difficulties to work on your computer. In this post I am going to share a trick by which you can control the mouse pointer without actually using mouse. You can do this with the help of keyboard. Some simple steps are given below by which you can perform this trick.
Also Read: How to format an unformatable Pendrive
Also Read: How to install Hindi font in windows xp
How to Use Mouse Without Actually Using it?
1. First of all click on start button by pressing windows key on your Keyboard.2. Than with the help of arrow keys navigate to Control Panel option and than press enter.
3. Now again with the help of arrow keys navigate to Accessibility Options and than press enter.
3. Now again with the help of arrow keys navigate to Accessibility Options and than press enter.
4. In the next window, go to mouse option by pressing Tab button 9 times and than pressing right arrow key.
5. Now again press Tab button and than Space-bar to select Use Mouse Keys Option.
6. You can also change the mouse pointer options such as its speed, Acceleration by going to Settings option.
7. Than with the help of Tab button go to OK option and than press enter.
8. If every thing will be done correctly than you will be able to see a mouse icon in the system tray near the system time.

9. Now you can move mouse pointer with the help of buttons 7, 8, 9, 4, 6, 1, 2, 3 on the Numpad. Button 5 on the Numpad can be used to perform mouse’s left button function.
Note: To control mouse pointer with keyboard the Num Lock key must be on.
Update: Or you can try a simple way i.e. just press Alt+Shift+Num Lock at a time, then activate mouse keys in the dialogue box that appears and press ok.
Update: Or you can try a simple way i.e. just press Alt+Shift+Num Lock at a time, then activate mouse keys in the dialogue box that appears and press ok.
Saturday, February 14, 2015
How to Send Email Using VB Net
Sending and receiving emails has now became an important task in our daily life. Email service providers such as Hotmail, Gmail & Yahoo have provided their SMTP Ports so that third party developers can use them in their applications.
In visual basic.net we use SMTP i.e Simple Mail Transfer Protocal which help us in composing electronic mails and send them to various sources.
Also Read: SQL Injection Attacks - How to Prevent VB.Net Database Applications

We need to import the following namespace “Imports System.Net.Mail” in order to use the SMTP class.
You can get a more detailed information from the Microsoft Developer Network’s website http://msdn.microsoft.com/en-us/library/system.net.mail(v=vs.110).aspx
1. Create a new windows form application project in visual basic.net.
2. Add three labels and three textboxes and name them as given below:
Label1 - To
Label2 - Subject
Label3 - Body
3. Add a button and change its text to Send.
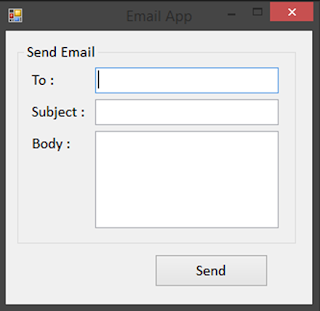
4. Double click button to switch to code view and paste the code given below.
5. Change youremail with your current email address and yourpassword with your email ID’s password. Don’t forget to import the following namespace: Imports System.Net.Mail
That’s it!! Run your Project and send a test email.
Note: It works only with Gmail Account because we have used Gmail’s SMTP Port.
In visual basic.net we use SMTP i.e Simple Mail Transfer Protocal which help us in composing electronic mails and send them to various sources.
Also Read: SQL Injection Attacks - How to Prevent VB.Net Database Applications
We need to import the following namespace “Imports System.Net.Mail” in order to use the SMTP class.
About System.Net.Mail Namespace
This Namespace provides various list of classes that help us to create, send, receive and do many other email related tasks.You can get a more detailed information from the Microsoft Developer Network’s website http://msdn.microsoft.com/en-us/library/system.net.mail(v=vs.110).aspx
How to Send Email Using VB.Net
I’ll demonstrate a simple example that allow us to send emails in vb.net:1. Create a new windows form application project in visual basic.net.
2. Add three labels and three textboxes and name them as given below:
Label1 - To
Label2 - Subject
Label3 - Body
3. Add a button and change its text to Send.
4. Double click button to switch to code view and paste the code given below.
Dim MyMailMessage As New MailMessage()
        Try
        MyMailMessage.From = New MailAddress("youremail")
        MyMailMessage.To.Add(TextBox1.Text)
        MyMailMessage.Subject = TextBox2.Text
        MyMailMessage.Body = TextBox3.Text
        Dim SMTP As New SmtpClient("smtp.gmail.com")
        SMTP.Port = 587
        SMTP.EnableSsl = True
        SMTP.Credentials = New System.Net.NetworkCredential("youremail", "yourpassword")
        SMTP.Send(MyMailMessage)
        MsgBox("Your Mail has been Successfully sent")
        TextBox1.Clear()
        TextBox2.Clear()
        TextBox3.Clear()
        TextBox1.Focus()
        Catch ex As Exception
            MsgBox(ex.ToString)
        End Try
5. Change youremail with your current email address and yourpassword with your email ID’s password. Don’t forget to import the following namespace: Imports System.Net.Mail
That’s it!! Run your Project and send a test email.
Note: It works only with Gmail Account because we have used Gmail’s SMTP Port.
Friday, February 13, 2015
What is Dictionary Attacks how Its Work
 |
| What is Dictionary Attacks? how Its Work |
What is Dictionary Attacks?
Ans:The only difference with a bruteforce attack and Dictionary attack is that "A Dictionary attack tries the passwords which we want it to try". Confusing?. In a dictionary attack we have the freedom to choose a huge list of words that people commonly use in their password (Depending upon the situation). The following video will help you understand more about Dictionary attacks.http://www.youtube.com/watch?v=9B4e0p6zbwk&feature=player_embedded ( Dictionary Attacks tutorial ).
Purchase Structured Settlements
Mesothelioma Lawyers San Diego
Secured Loan Calculator
Wednesday, February 11, 2015
Google Gravity How to Hack Google Homepage Funny Trick
.jpg "Google Gravity: How to Hack Google Homepage (Funny Trick)")
Have you ever thought about hacking Google? In practical this is not possible. Do you hate Google or you are get bored of Google? If yes then here is the solution for it. Now you have a chance to play with Google homepage. A programmer named Mr Doob who coded a script named Google Gravity. It allows every components on Google homepage to fall down and you can move them freely using mouse.
Also Read: The 5 biggest tech myths prevailing among common man
Also Read: The Top 10 Best iPhone Apps of 2013
Funny Trick to Hack Google Homepage
1. First of all go to the link https://www.google.com/
2. Type Google Gravity in the search box and click on I’m Feeling Lucky button. Make sure that Google Instant is off.
3. Or go to the link mrdoob.com/projects/chromeexperiments/google_gravity/
4. Now Google homepage will open where all components start falling down to the bottom of the browser. You can easily move components like images, text, search box wherever you want using your mouse pointer.
Just watch the below video to know how this works.
Just watch the below video to know how this works.
Note: Remember that this trick works only in google chrome and works partially in firefox.This trick is not working with Internet Explorer.
Monday, February 2, 2015
How to Download Google Apps

Google Apps
Asalam-o-Alaikum Friends!!!
Umeed Kerta hou ap sub Khairyet se honge, toh Dosto aj mai ap ko btao ga k ap apne PC se "Google Play" se ap Software kase Download karskte hain.
Screen Shot Follow kare or sub se Phle "Google Play" open kare.


How to Write Urdu in Adobe Photoshop CS6

الســــــلام علیــــــکم ورحمۃ اللہ وبرکاتہ
میــــں کافـــی دنـــوں ســے دیکــھ رہــا ہـــوں اکثــر ممبـــرز خــاص طــور پــر وہ جــو اڈوب فــوٹــو شــاپ کــے نئــے یــوزر ہیــں
آئــے روز تھـــریــڈ بنــائے رکھتــے ہیــں کہ اڈوب فــوٹــو شــاپ میــں اردو کیســے لکھیـــں
آج میــرا ماتھـــا ٹھنکــا میــں نــے آئــی ٹــی دنیــا پــر ســرچ کیــا مجھــے کوئــی تھــریــڈ نہیــں مــلا
مگـــرمجھـــےگوگـل پـــر ایک طــــریقــــہ مــل گیــا جــو کــہ آپ لــوگــوں کــے ساتــھ شئیـــر کــر رہــا ہــوں۔میــں چاہتــا ہــوں کہ اگـــر ہو سکـــے تـــو میــرا یــہ تھــــریڈ اِسٹکـــــــی کیـــا جائــــــــــے۔
تصــــاویـــــــــر فـالـــــو کیجیـــــــــے۔۔۔
میــــں کافـــی دنـــوں ســے دیکــھ رہــا ہـــوں اکثــر ممبـــرز خــاص طــور پــر وہ جــو اڈوب فــوٹــو شــاپ کــے نئــے یــوزر ہیــں
آئــے روز تھـــریــڈ بنــائے رکھتــے ہیــں کہ اڈوب فــوٹــو شــاپ میــں اردو کیســے لکھیـــں
آج میــرا ماتھـــا ٹھنکــا میــں نــے آئــی ٹــی دنیــا پــر ســرچ کیــا مجھــے کوئــی تھــریــڈ نہیــں مــلا
مگـــرمجھـــےگوگـل پـــر ایک طــــریقــــہ مــل گیــا جــو کــہ آپ لــوگــوں کــے ساتــھ شئیـــر کــر رہــا ہــوں۔میــں چاہتــا ہــوں کہ اگـــر ہو سکـــے تـــو میــرا یــہ تھــــریڈ اِسٹکـــــــی کیـــا جائــــــــــے۔
تصــــاویـــــــــر فـالـــــو کیجیـــــــــے۔۔۔


Subscribe to:
Posts (Atom)